


Step 0: Probably the most overlooked step in the game.
I needed to “define” what I actually wanted to accomplish. Not my goals for the content I make or even the type of content I wanted to make, but what I wanted to get out of this new way to share things online. For me, that was a few things.
Most importantly, I want to maintain freedom in choosing my format without the automated process restricting the length, quality, or the number of media I can post within a certain time frame. Secondly, I want to spend as little money as possible on a recurring basis. Thirdly, I want to be able to perform all the necessary tasks without relying on apps installed on my phone at each step. Ultimately, I aim to eliminate these apps from my mobile devices completely, except for my work laptop. Fourthly(?), Reduce reliance on internet-connected tools for backend processes before posting, and limit the use of offline tools for scheduling and starting posts. Fifthly(?), Ensure the automations are flexible in case I decide to modify my posting schedule. Sixthly(?), Ensure the steps are simple to explain if I ever need to delegate some or part of the tasks to others. Seventhly(?), requires minimal customization through coding and scripting. Eighthly(?), Use AI solely for troubleshooting or constructing small code blocks to enhance efficiency.
If those 8 things sound aligned with how you want to approach automating some social media tasks for your business without losing your personal touch to it, continue reading. If not, check out the FITLETE Resource Nexus for personal trainers HERE.
Step 1:Selecting a “distribution” hub
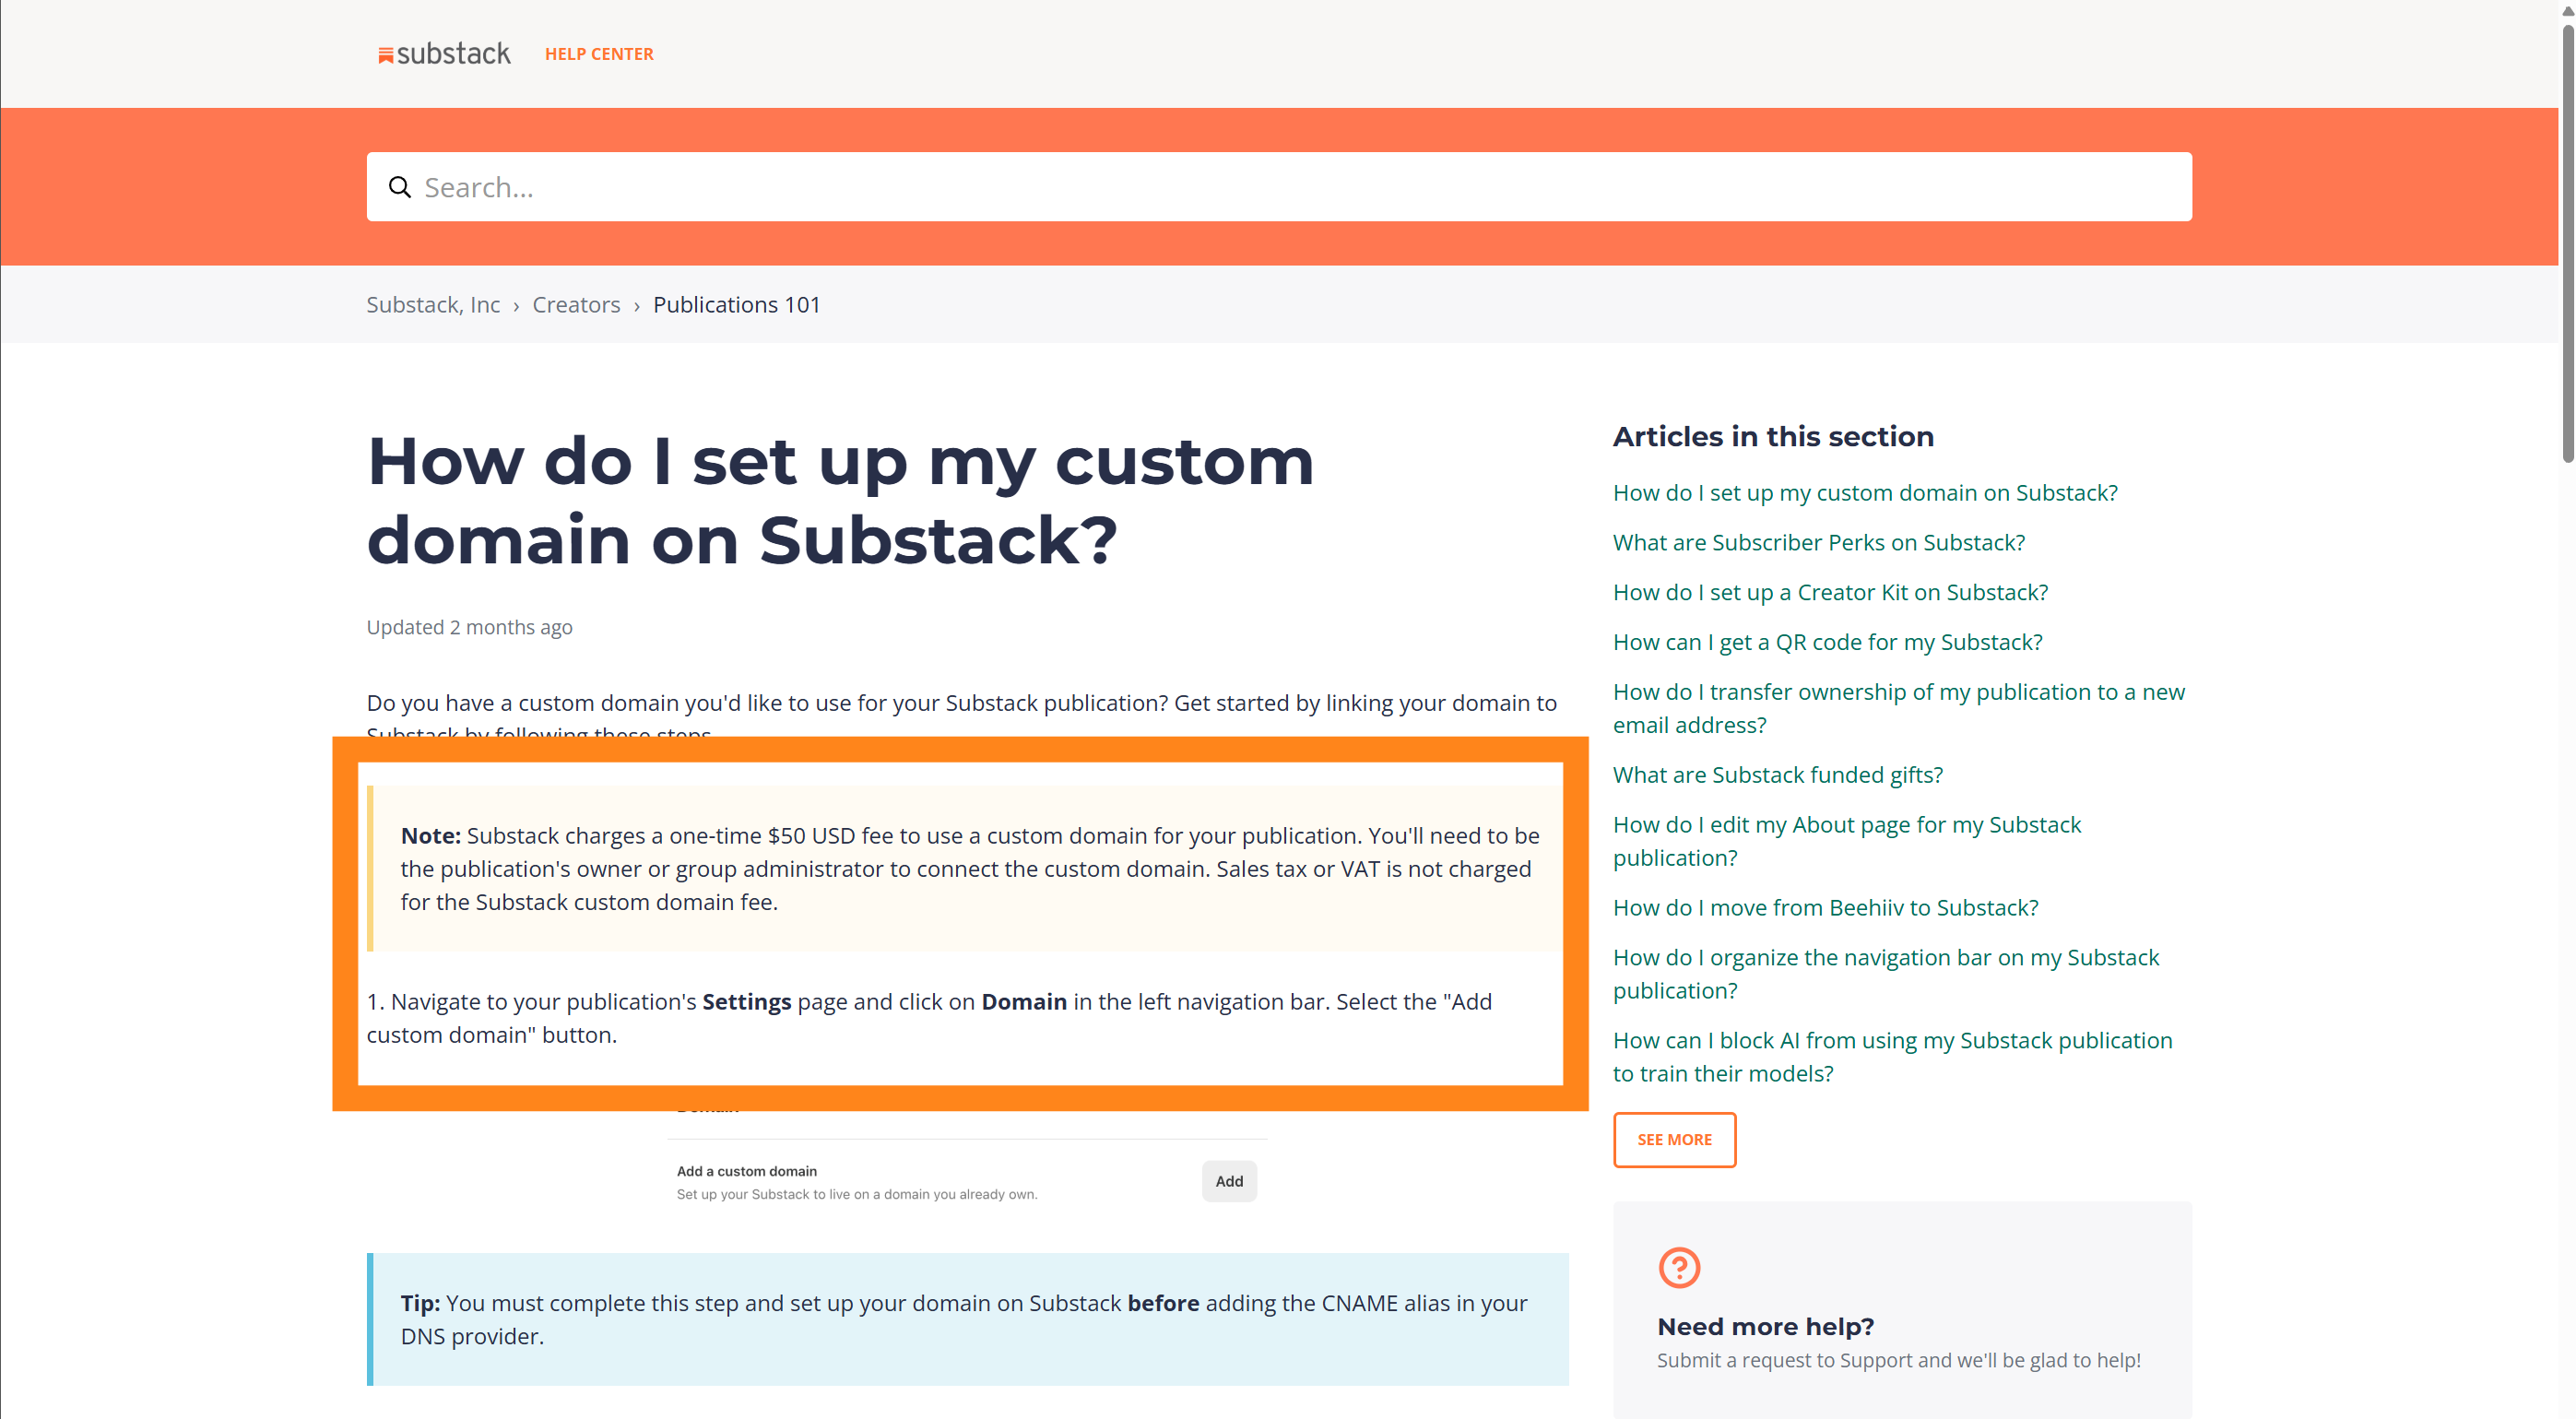
SUBSTACK: One entry point for all the content. There's a small one-time fee to connect to your domain; I think it’s still $50. Chris Liddle showed me Substack a few years back; I haven't looked back. They handle many of the big tasks that could make a mission like this one more costly & complex if I tried to set it up on my own. So, all that to say, 1 Substack Publication for all of FITLETE’s public updates, and everything will run from it. Here’s the why.
Substack has 1 RSS feed for your publication, so everything you do there will update from this one feed.
Substack supports articles, photos, videos, live streams, and multiple podcasts.
Substack allows you to connect 1 YouTube account and will automatically post to your channel if you want to.
The YouTube connection is important because it lets Substack handle video uploads for you: short-form videos are shared as YouTube Shorts, and longer videos as traditional videos.
Any Postcast you have will auto-publish to YouTube here as well, even “audio only” shows like the Coaches Spotlight Series.
Using new sections in a single publication self-organizes the content. I created a new section in my publication specifically for the social media posts.
This section is set up to be separate from my main subscribers and to not update on the homepage. Unless someone explicitly signs up for this section, it also will not send emails to anyone when new items are published. New subscribers are not “auto-subscribed” to this section either when they subscribe to This Week In FITLETE’s Monday Report.
Step 2:Selecting a content planning space.
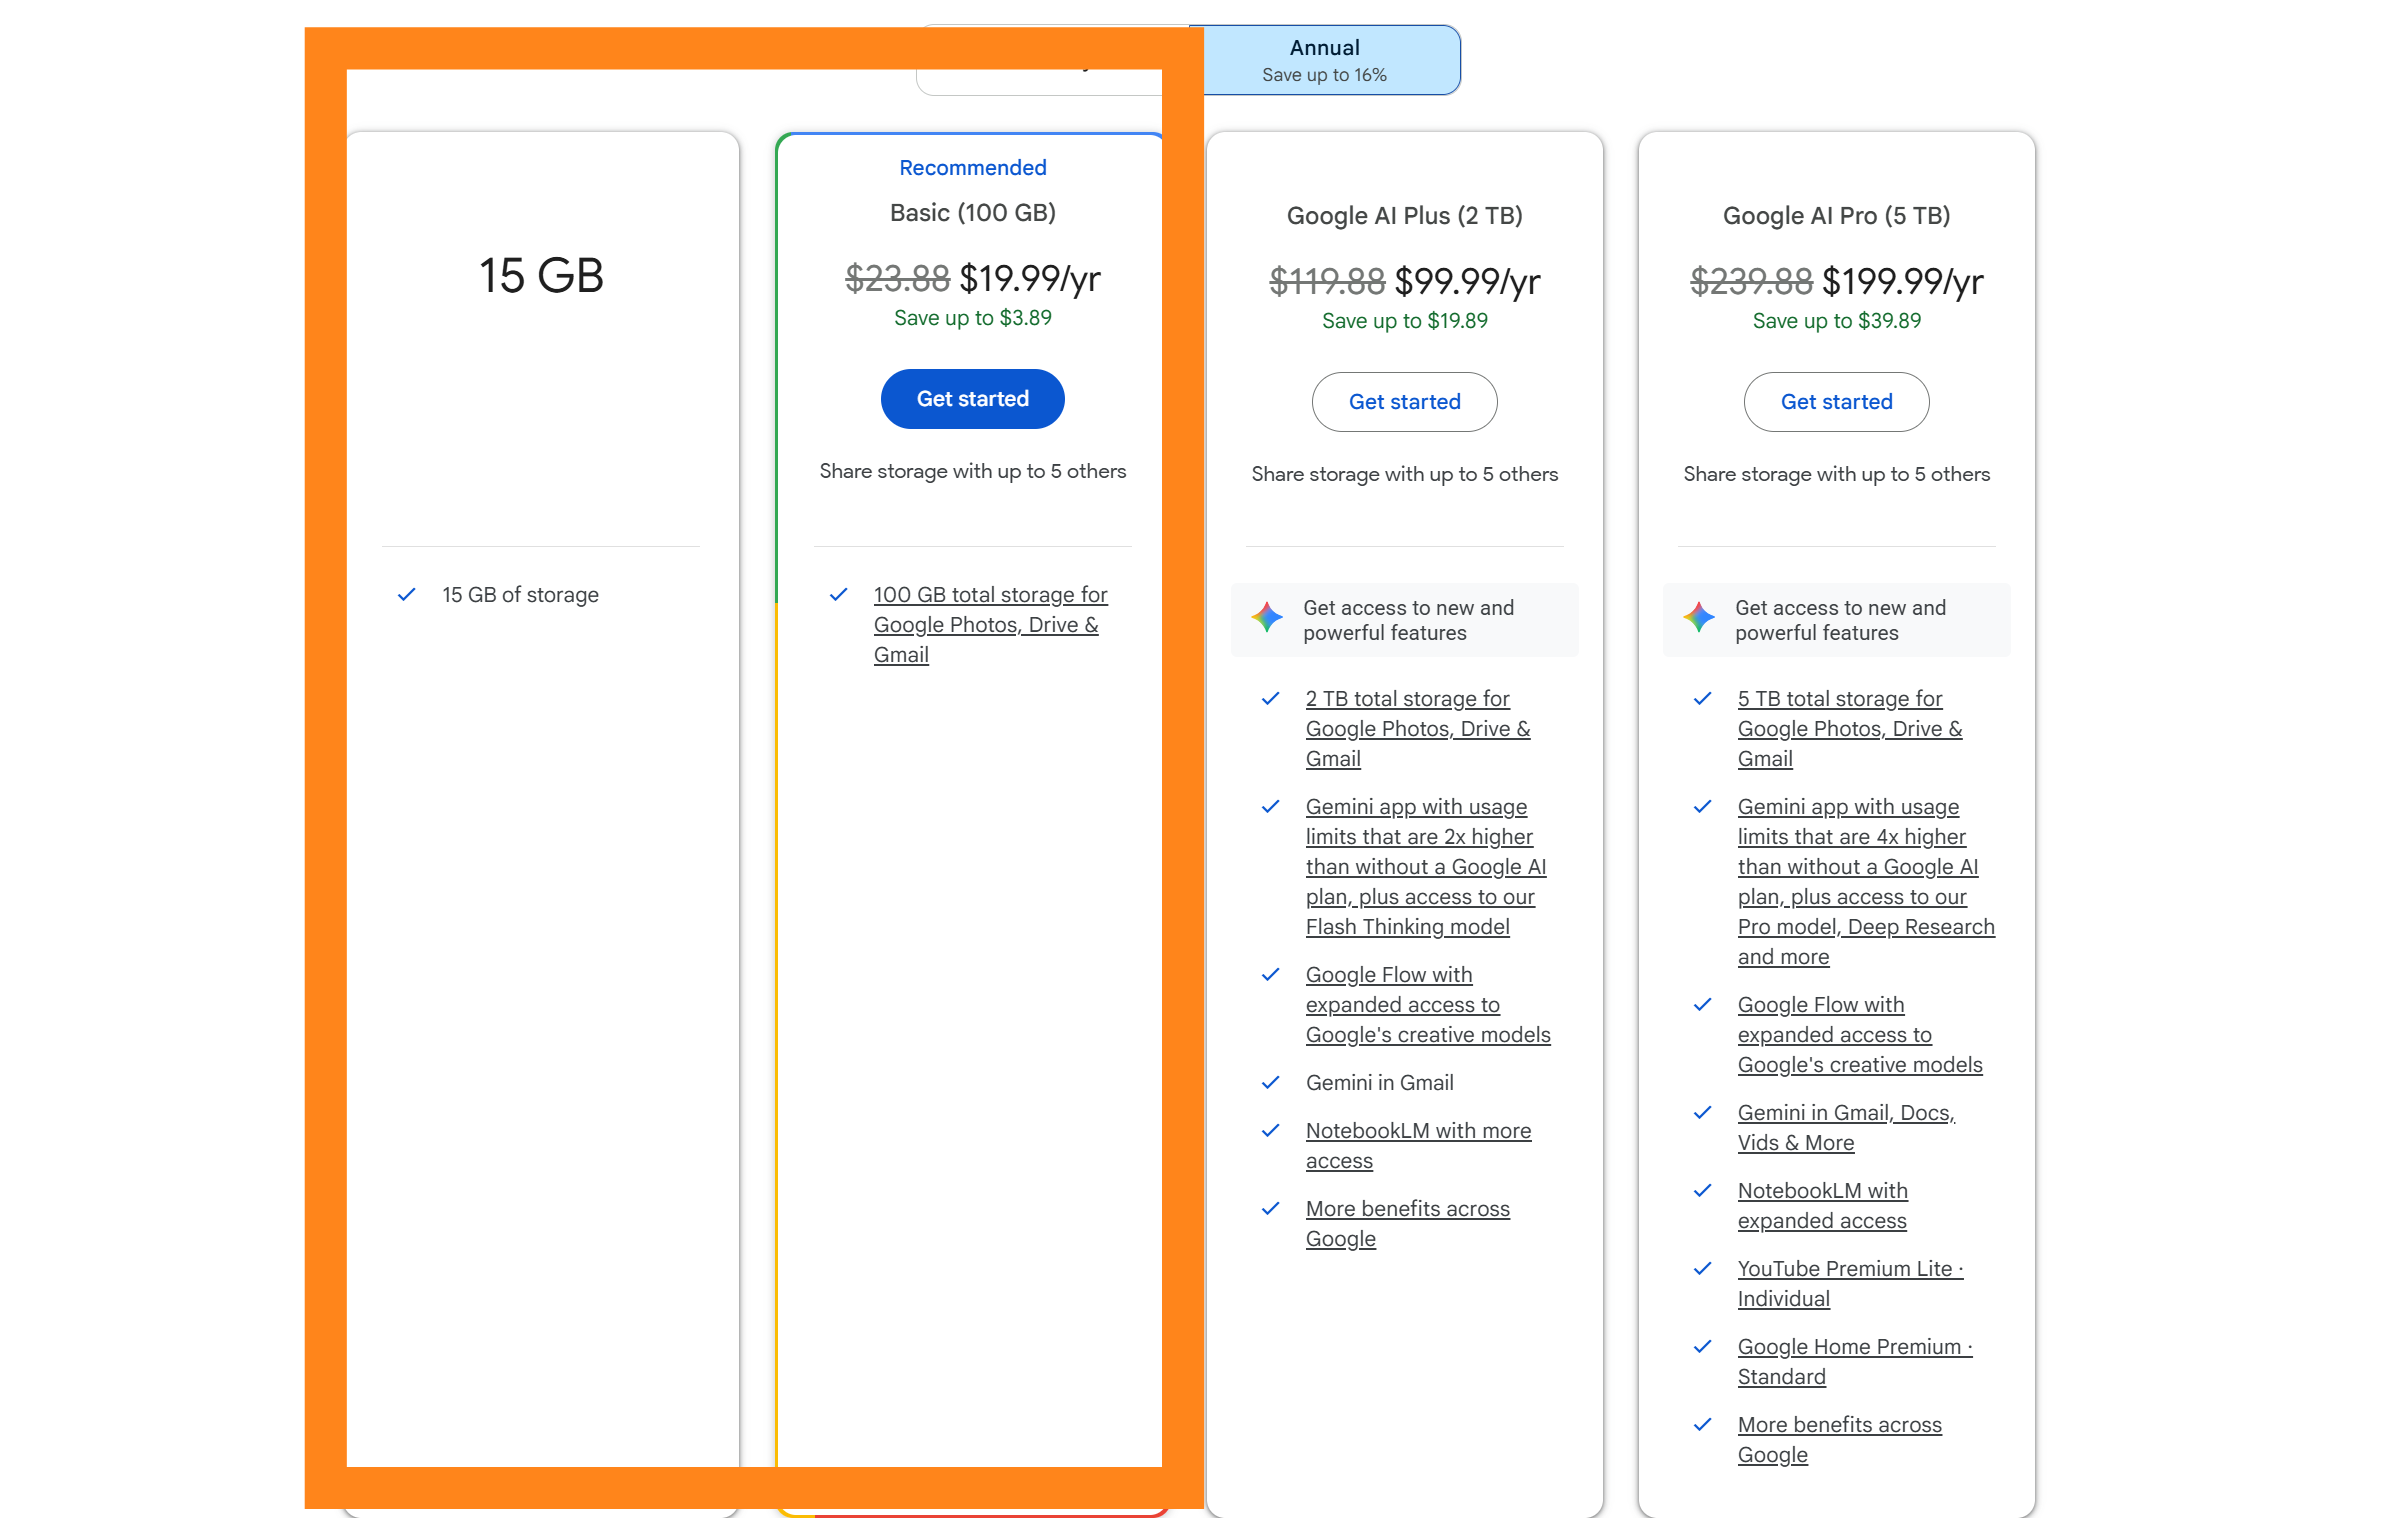
Google Drive/Sheets: this is where you make and store, sort, plan, & prepare everything before you’re ready to share it. 15 GB-2 TB storage is $0-$119 per year. Google Drive is my work storage space, even for non-Google-related file types and software. This step will be where you spend most of your time and effort.
Once I created & edited all the photos or videos I wanted to share, I placed them into different folders based on the day of the week I wanted to share them. For example, I post a photo every Monday for THE Monday Report, so I have a 2026 folder with 52 photos. To keep things better organized, I also picked a consistent file-naming format that includes the date. I did this because I can use it to sort and organize by date in Google Sheets later. It looks something like this “2026.01.05 -MONDAY-REPORT”
To make this file titling easy, I used Windows PowerShell and a simple script in a .txt editor to rename all the .jpg files all at once so I didn't have to do it manually (if you send me a message, I'll share that with you because it’s actually really easy and doesn’t use AI or an internet connection).
Once I had all this done, I added the folder to my synced Google Drive and uploaded it there. Then I created a static content posting schedule to test daily posting at 7:15 PM EST.
Since all the photos are now on Google Drive, they have their own unique URL/links that I can copy and add to the spreadsheet and grab the photos when the automation runs. Use column headers that make it easy for you to understand what info you are grabbing; it simplifies setting up the make.com step later. I set up my spreadsheet like this:
Col A= google-drive-image-url: This is where you place ALL of the links to your media files from Google Drive. Make sure they are visually the URL, and not a hyperlink of the file name.
Col B=pixeldrainURL: You will need this column to hold the links to the direct media file that the platforms will upload.
Col C=drive-file-title: You can either paste the links again and use the hyperlinked filename, or you extract it using a small Google App Script. Both take the same amount of time and cost the same amount.
Col D=SUBSTACK-title: Here, you will create a unique title for your Substack post. It will be the “identifier” for your automation, so it has to be unique and match exactly what you will use on Substack.
Col E=SUBSTACK-subtitle: This has a ~200 character limit and can be whatever you want. It’s displayed in Substack and some sites when you share a link to your articles, but you can also use it in your automation. I chose to make subtitles that I can repeat and help categorize my posts.
Col F=social-caption: Pretty much unlimited characters, and you can use this in your automation as well.
Col G=schedule-time: It's more of a visual aid for you on the backend to understand what time of day you'll schedule your automation to run, but it doesn’t need to be used in your automations. I use it to add different times if I want to post multiple times per day in the future.
With this set up, you can write all your titles, subtitles, and captions for each piece of media directly into the spreadsheet. Now you’re ready for step 3.
Step 3: Temporary media hosting.
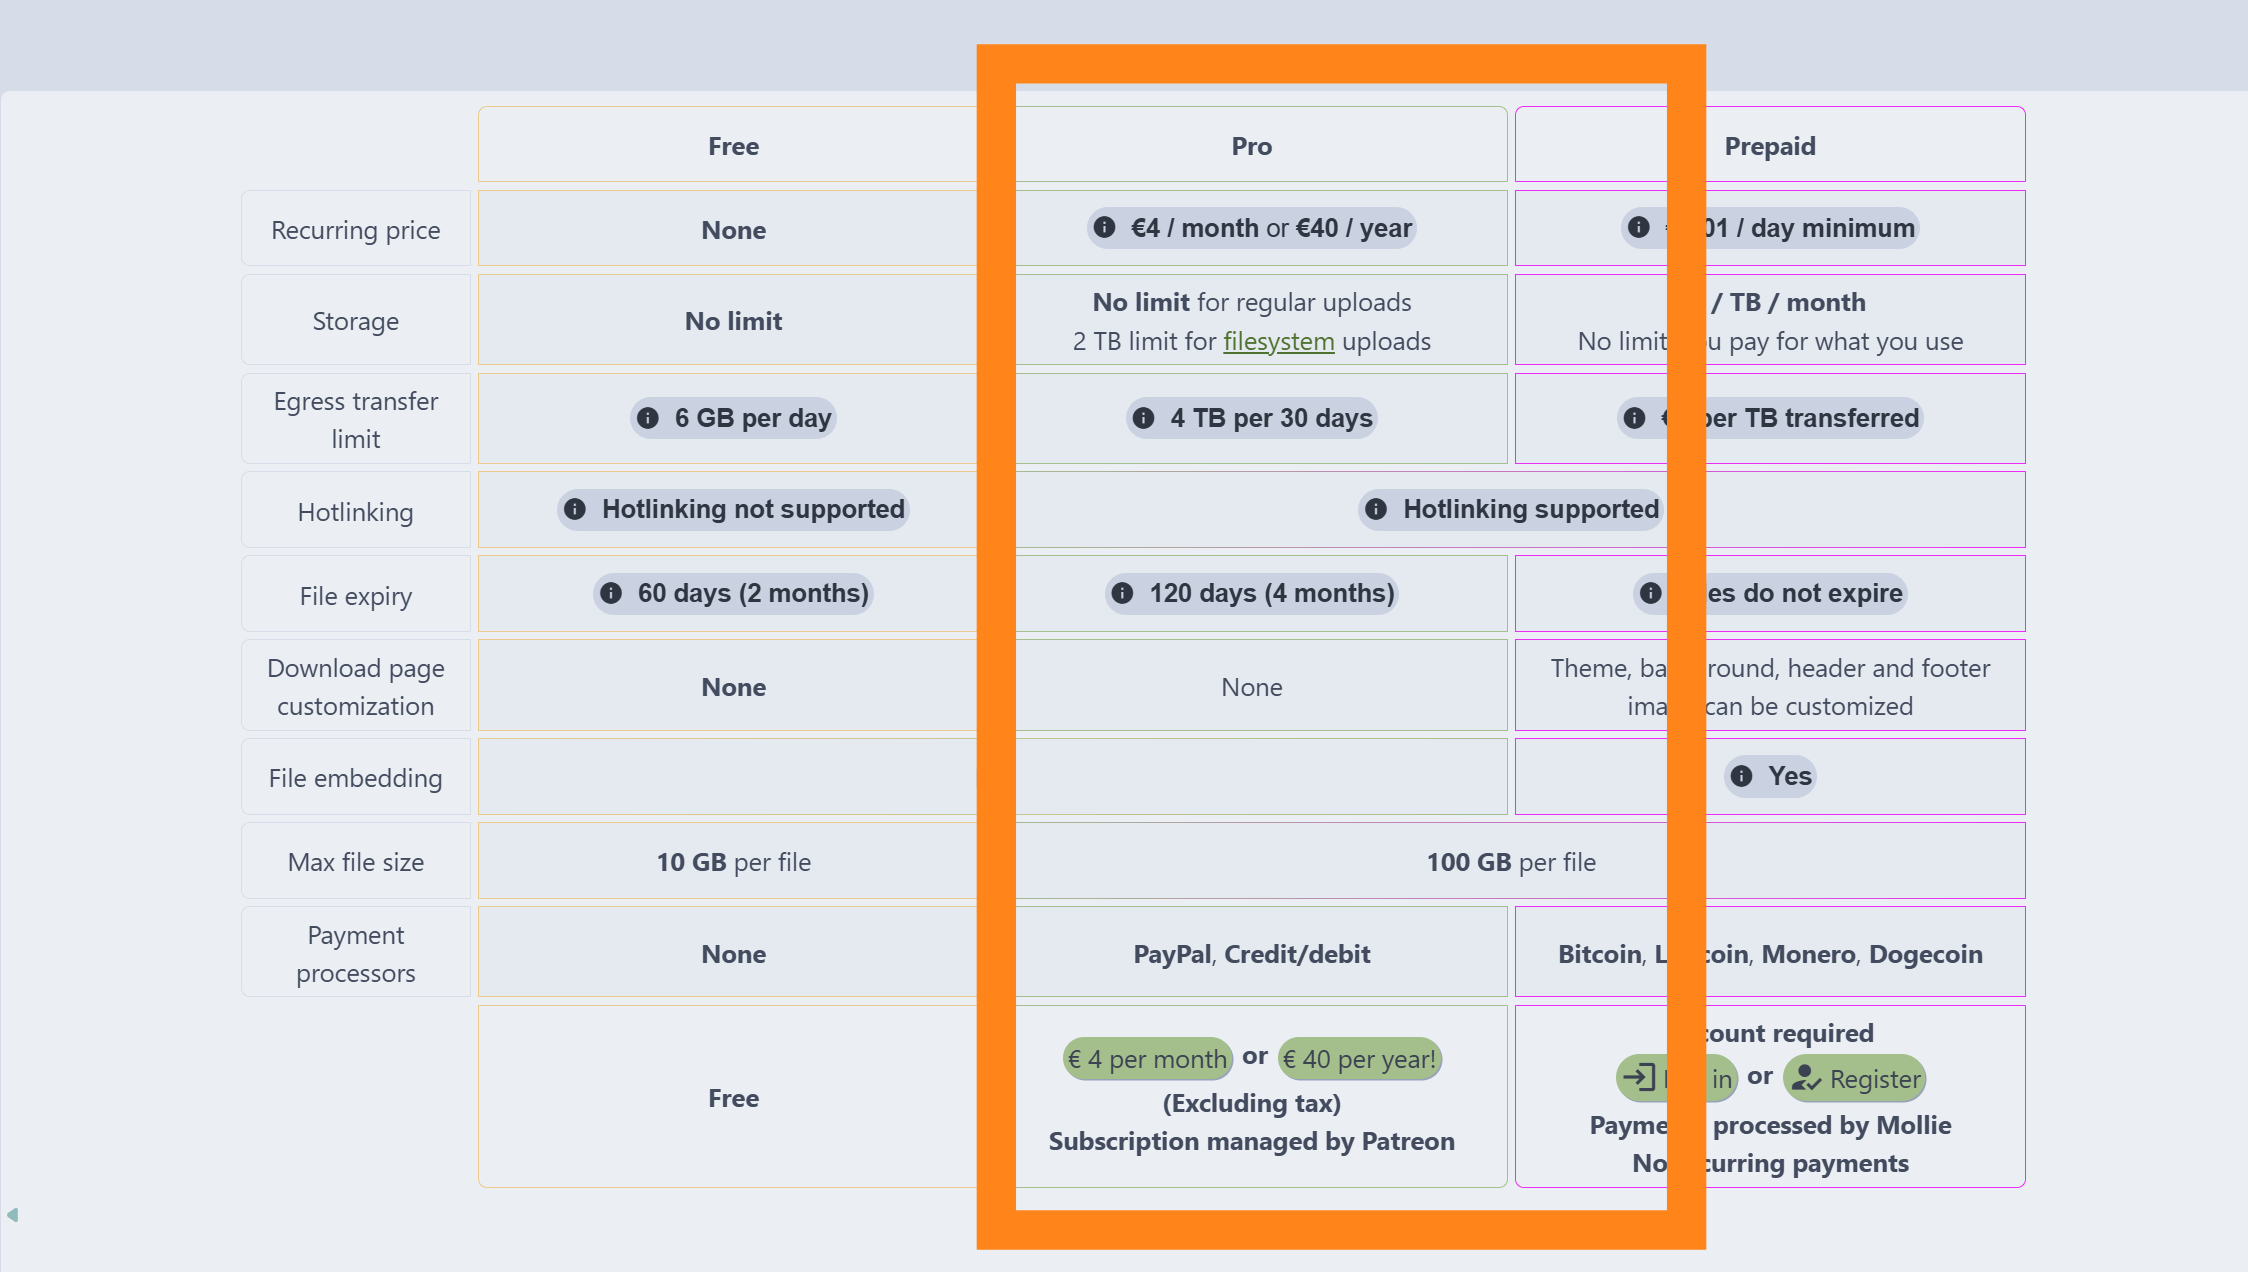
PixelDrain.com Storage and data transfer services. $40 per year. Because you need the “Hotlinking” service supported. Unfortunately, many social platforms do not accept public or shareable media links from Google Drive (and other large cloud storage services) as a valid method for transferring media files to their platforms. They used to, but stopped sometime last year, so this step is extra but crucial.
Pixeldrain’s paid accounts allow for “hot linking” so you can't do this with a free account. All files expire (are deleted) after 120 days on the pro account, which I recommend so you're not saving duplicate media files long-term in Google Drive and Pixeldrain. It also gives you a 120-day content planning cycle that you can stick to. Sometimes limitations breed better creativity.
Pixeldrain has an API that you can use to upload your media files from the Google Drive spreadsheet through an app script. It happens automatically and in the background, so you can step away from your laptop for the day or work on other stuff while it runs.
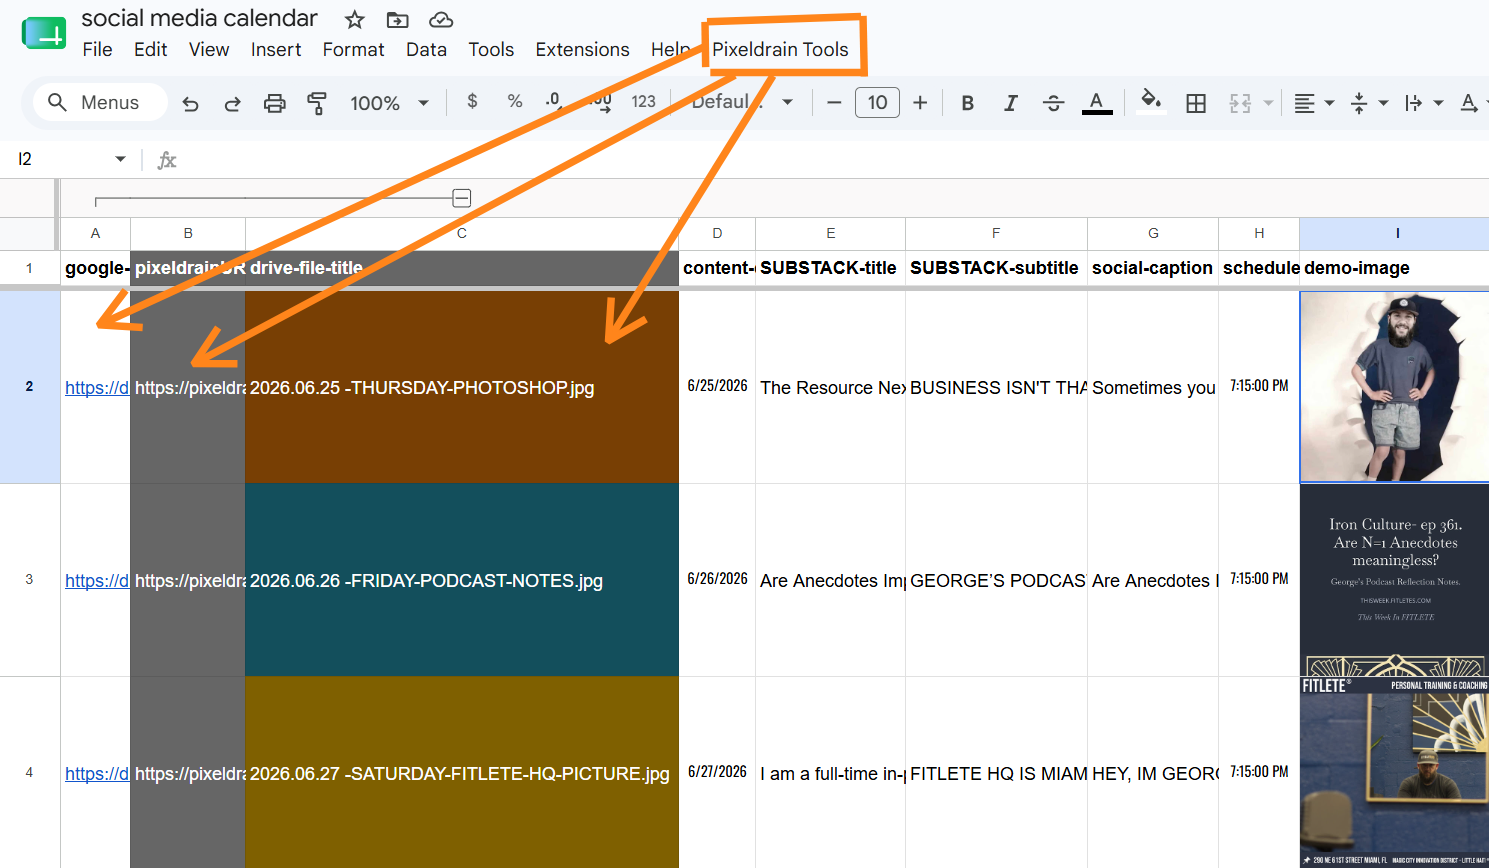
I made an app script that creates a menu item (pictured above) for the spreadsheet to check a row for a Pixeldrain link in Col B. If there is, then that row is skipped; if there isn’t, it takes the Google Drive file link in Col A and uploads the media to my Pixeldrain cloud. Once the media is uploaded successfully, it retrieves the Pixeldrain cloud link and writes it back to the spreadsheet in Col B. Finally, it extracts the filename from the Google Drive link and writes it to Col C.
Here is the script so you can add it to your sheet. The only parts you need to adjust for your google sheet are in the //CONFIG section; add your own sheet name like ‘sheet 1’ and then add your pixeldrain api key.
// ==============================
// CONFIG
// ==============================
const SHEET_NAME         = 'ADD YOUR SHEET NAME'; // <-- change this
const START_ROW          = 2;        // row 1 = headers

const COL_DRIVE_URL      = 1;        // A = google-drive-image-url
const COL_PIXELDRAIN_URL = 2;        // B = pixeldrainURL
const COL_DRIVE_TITLE    = 3;        // C = drive-file-title

const PIXELDRAIN_API_KEY = 'ADD YOUR PIXELDRAIN API KEY';       // <-- add your API key here
// ==============================
// MENU
// ==============================
function onOpen() {
  SpreadsheetApp.getUi()
    .createMenu('Pixeldrain Tools')
    .addItem('Upload missing files (all rows)', 'uploadMissingFilesToPixeldrain')
    .addItem('Upload selected rows only', 'uploadSelectedRowsToPixeldrain')
    .addSeparator()
    .addItem('Rebuild titles only', 'fillMissingDriveTitles')
    .addToUi();
}
// ==============================
// MENU ACTIONS
// ==============================
function uploadMissingFilesToPixeldrain() {
  const sheet = getConfiguredSheet_();
  if (!sheet) return;

  const lastRow = sheet.getLastRow();
  if (lastRow < START_ROW) {
    SpreadsheetApp.getUi().alert('No data rows found.');
    return;
  }

  const rowNumbers = [];
  for (let row = START_ROW; row <= lastRow; row++) {
    rowNumbers.push(row);
  }

  processRows_(sheet, rowNumbers, {
    uploadMissing: true,
    fillTitles: true,
    skipIfPixeldrainUrlExists: true,
    titleOnly: false
  });
}

function uploadSelectedRowsToPixeldrain() {
  const sheet = getConfiguredSheet_();
  if (!sheet) return;

  const selectedRows = getSelectedRowNumbers_(sheet);

  if (!selectedRows.length) {
    SpreadsheetApp.getUi().alert(
      'No rows selected.\n\nSelect one or more rows in "' + SHEET_NAME + '" and try again.'
    );
    return;
  }

  processRows_(sheet, selectedRows, {
    uploadMissing: true,
    fillTitles: true,
    skipIfPixeldrainUrlExists: true,
    titleOnly: false
  });
}

function fillMissingDriveTitles() {
  const sheet = getConfiguredSheet_();
  if (!sheet) return;

  const lastRow = sheet.getLastRow();
  if (lastRow < START_ROW) {
    SpreadsheetApp.getUi().alert('No data rows found.');
    return;
  }

  const rowNumbers = [];
  for (let row = START_ROW; row <= lastRow; row++) {
    rowNumbers.push(row);
  }

  processRows_(sheet, rowNumbers, {
    uploadMissing: false,
    fillTitles: true,
    skipIfPixeldrainUrlExists: false,
    titleOnly: true
  });
}
// ==============================
// CORE PROCESSOR
// ==============================
function processRows_(sheet, rowNumbers, options) {
  const ui = SpreadsheetApp.getUi();

  let uploadedCount = 0;
  let titleUpdatedCount = 0;
  let skippedCount = 0;
  let errorCount = 0;

  const uniqueSortedRows = [...new Set(rowNumbers)]
    .filter(r => r >= START_ROW)
    .sort((a, b) => a - b);

  for (let i = 0; i < uniqueSortedRows.length; i++) {
    const rowNumber = uniqueSortedRows[i];

    try {
      const rowValues = sheet.getRange(rowNumber, 1, 1, 3).getValues()[0];
      const driveUrl = rowValues[COL_DRIVE_URL - 1];
      const pixeldrainUrl = String(rowValues[COL_PIXELDRAIN_URL - 1] || '').trim();
      const driveTitle = String(rowValues[COL_DRIVE_TITLE - 1] || '').trim();

      if (!driveUrl) {
        skippedCount++;
        continue;
      }

      const driveFileId = extractDriveFileId(driveUrl);
      if (!driveFileId) {
        throw new Error('Could not extract Google Drive file ID from URL');
      }

      // Title-only mode
      if (options.titleOnly) {
        if (!driveTitle) {
          const title = DriveApp.getFileById(driveFileId).getName();
          sheet.getRange(rowNumber, COL_DRIVE_TITLE).setValue(title);
          titleUpdatedCount++;
        } else {
          skippedCount++;
        }
        continue;
      }

      // If already uploaded, skip upload but optionally fill missing title
      if (options.skipIfPixeldrainUrlExists && pixeldrainUrl) {
        if (!driveTitle && options.fillTitles) {
          const title = DriveApp.getFileById(driveFileId).getName();
          sheet.getRange(rowNumber, COL_DRIVE_TITLE).setValue(title);
          titleUpdatedCount++;
        } else {
          skippedCount++;
        }
        continue;
      }

      // Upload missing file
      if (options.uploadMissing) {
        const driveFile = DriveApp.getFileById(driveFileId);
        const fileName = driveFile.getName();
        const blob = driveFile.getBlob();

        const uploadResult = uploadBlobToPixeldrain_(blob, fileName);

        if (!uploadResult || !uploadResult.id) {
          throw new Error('Pixeldrain did not return a file ID');
        }

        const fullPixeldrainUrl = 'https://pixeldrain.com/api/file/' + uploadResult.id;

        sheet.getRange(rowNumber, COL_PIXELDRAIN_URL).setValue(fullPixeldrainUrl);
        uploadedCount++;

        if (options.fillTitles) {
          sheet.getRange(rowNumber, COL_DRIVE_TITLE).setValue(fileName);
          titleUpdatedCount++;
        }
      }

    } catch (e) {
      errorCount++;
      Logger.log('Row ' + rowNumber + ' failed: ' + e);
    }
  }

  ui.alert(
    'Finished.\n' +
    'Uploaded: ' + uploadedCount + '\n' +
    'Titles updated: ' + titleUpdatedCount + '\n' +
    'Skipped: ' + skippedCount + '\n' +
    'Errors: ' + errorCount
  );
}
// ==============================
// HELPERS
// ==============================
function getConfiguredSheet_() {
  const sheet = SpreadsheetApp.getActiveSpreadsheet().getSheetByName(SHEET_NAME);
  if (!sheet) {
    SpreadsheetApp.getUi().alert('Sheet not found: ' + SHEET_NAME);
    return null;
  }
  return sheet;
}

function getSelectedRowNumbers_(sheet) {
  const selection = SpreadsheetApp.getActiveSpreadsheet().getSelection();
  if (!selection) return [];

  const rangeList = selection.getActiveRangeList();
  if (!rangeList) {
    const singleRange = selection.getActiveRange();
    if (!singleRange) return [];
    return expandRangeToRowNumbers_(singleRange);
  }

  const ranges = rangeList.getRanges();
  const rows = [];

  for (let i = 0; i < ranges.length; i++) {
    const range = ranges[i];

    if (range.getSheet().getName() !== sheet.getName()) {
      continue;
    }

    rows.push(...expandRangeToRowNumbers_(range));
  }

  return [...new Set(rows)].sort((a, b) => a - b);
}

function expandRangeToRowNumbers_(range) {
  const startRow = range.getRow();
  const numRows = range.getNumRows();
  const rows = [];

  for (let i = 0; i < numRows; i++) {
    rows.push(startRow + i);
  }

  return rows;
}
// ==============================
// PIXELDRAIN UPLOAD
// ==============================
function uploadBlobToPixeldrain_(blob, fileName) {
  const url = 'https://pixeldrain.com/api/file/' + encodeURIComponent(fileName);

  const headers = {};
  if (PIXELDRAIN_API_KEY) {
    const token = Utilities.base64Encode(':' + PIXELDRAIN_API_KEY);
    headers['Authorization'] = 'Basic ' + token;
  }

  const options = {
    method: 'put',
    contentType: blob.getContentType() || 'application/octet-stream',
    payload: blob.getBytes(),
    headers: headers,
    muteHttpExceptions: true
  };

  const response = UrlFetchApp.fetch(url, options);
  const code = response.getResponseCode();
  const text = response.getContentText();

  if (code < 200 || code >= 300) {
    throw new Error('Pixeldrain upload failed. HTTP ' + code + ': ' + text);
  }

  return JSON.parse(text);
}
// ==============================
// DRIVE FILE ID PARSER
// ==============================
function extractDriveFileId(url) {
  let match = url.match(/\/file\/d\/([a-zA-Z0-9_-]+)/);
  if (match && match[1]) return match[1];

  match = url.match(/[?&]id=([a-zA-Z0-9_-]+)/);
  if (match && match[1]) return match[1];

  return null;
}
Once you get this set up and saved, refresh the page so you can see the PixelDrain menu item in your spreadsheet. Now you can add a Google Drive image link in Col A and test your connection. This usually takes a minute or a few, depending on the size of your file. If it’s a good connection, you are ready for step 4.
Step 4: Setting up the Automated posting flow.
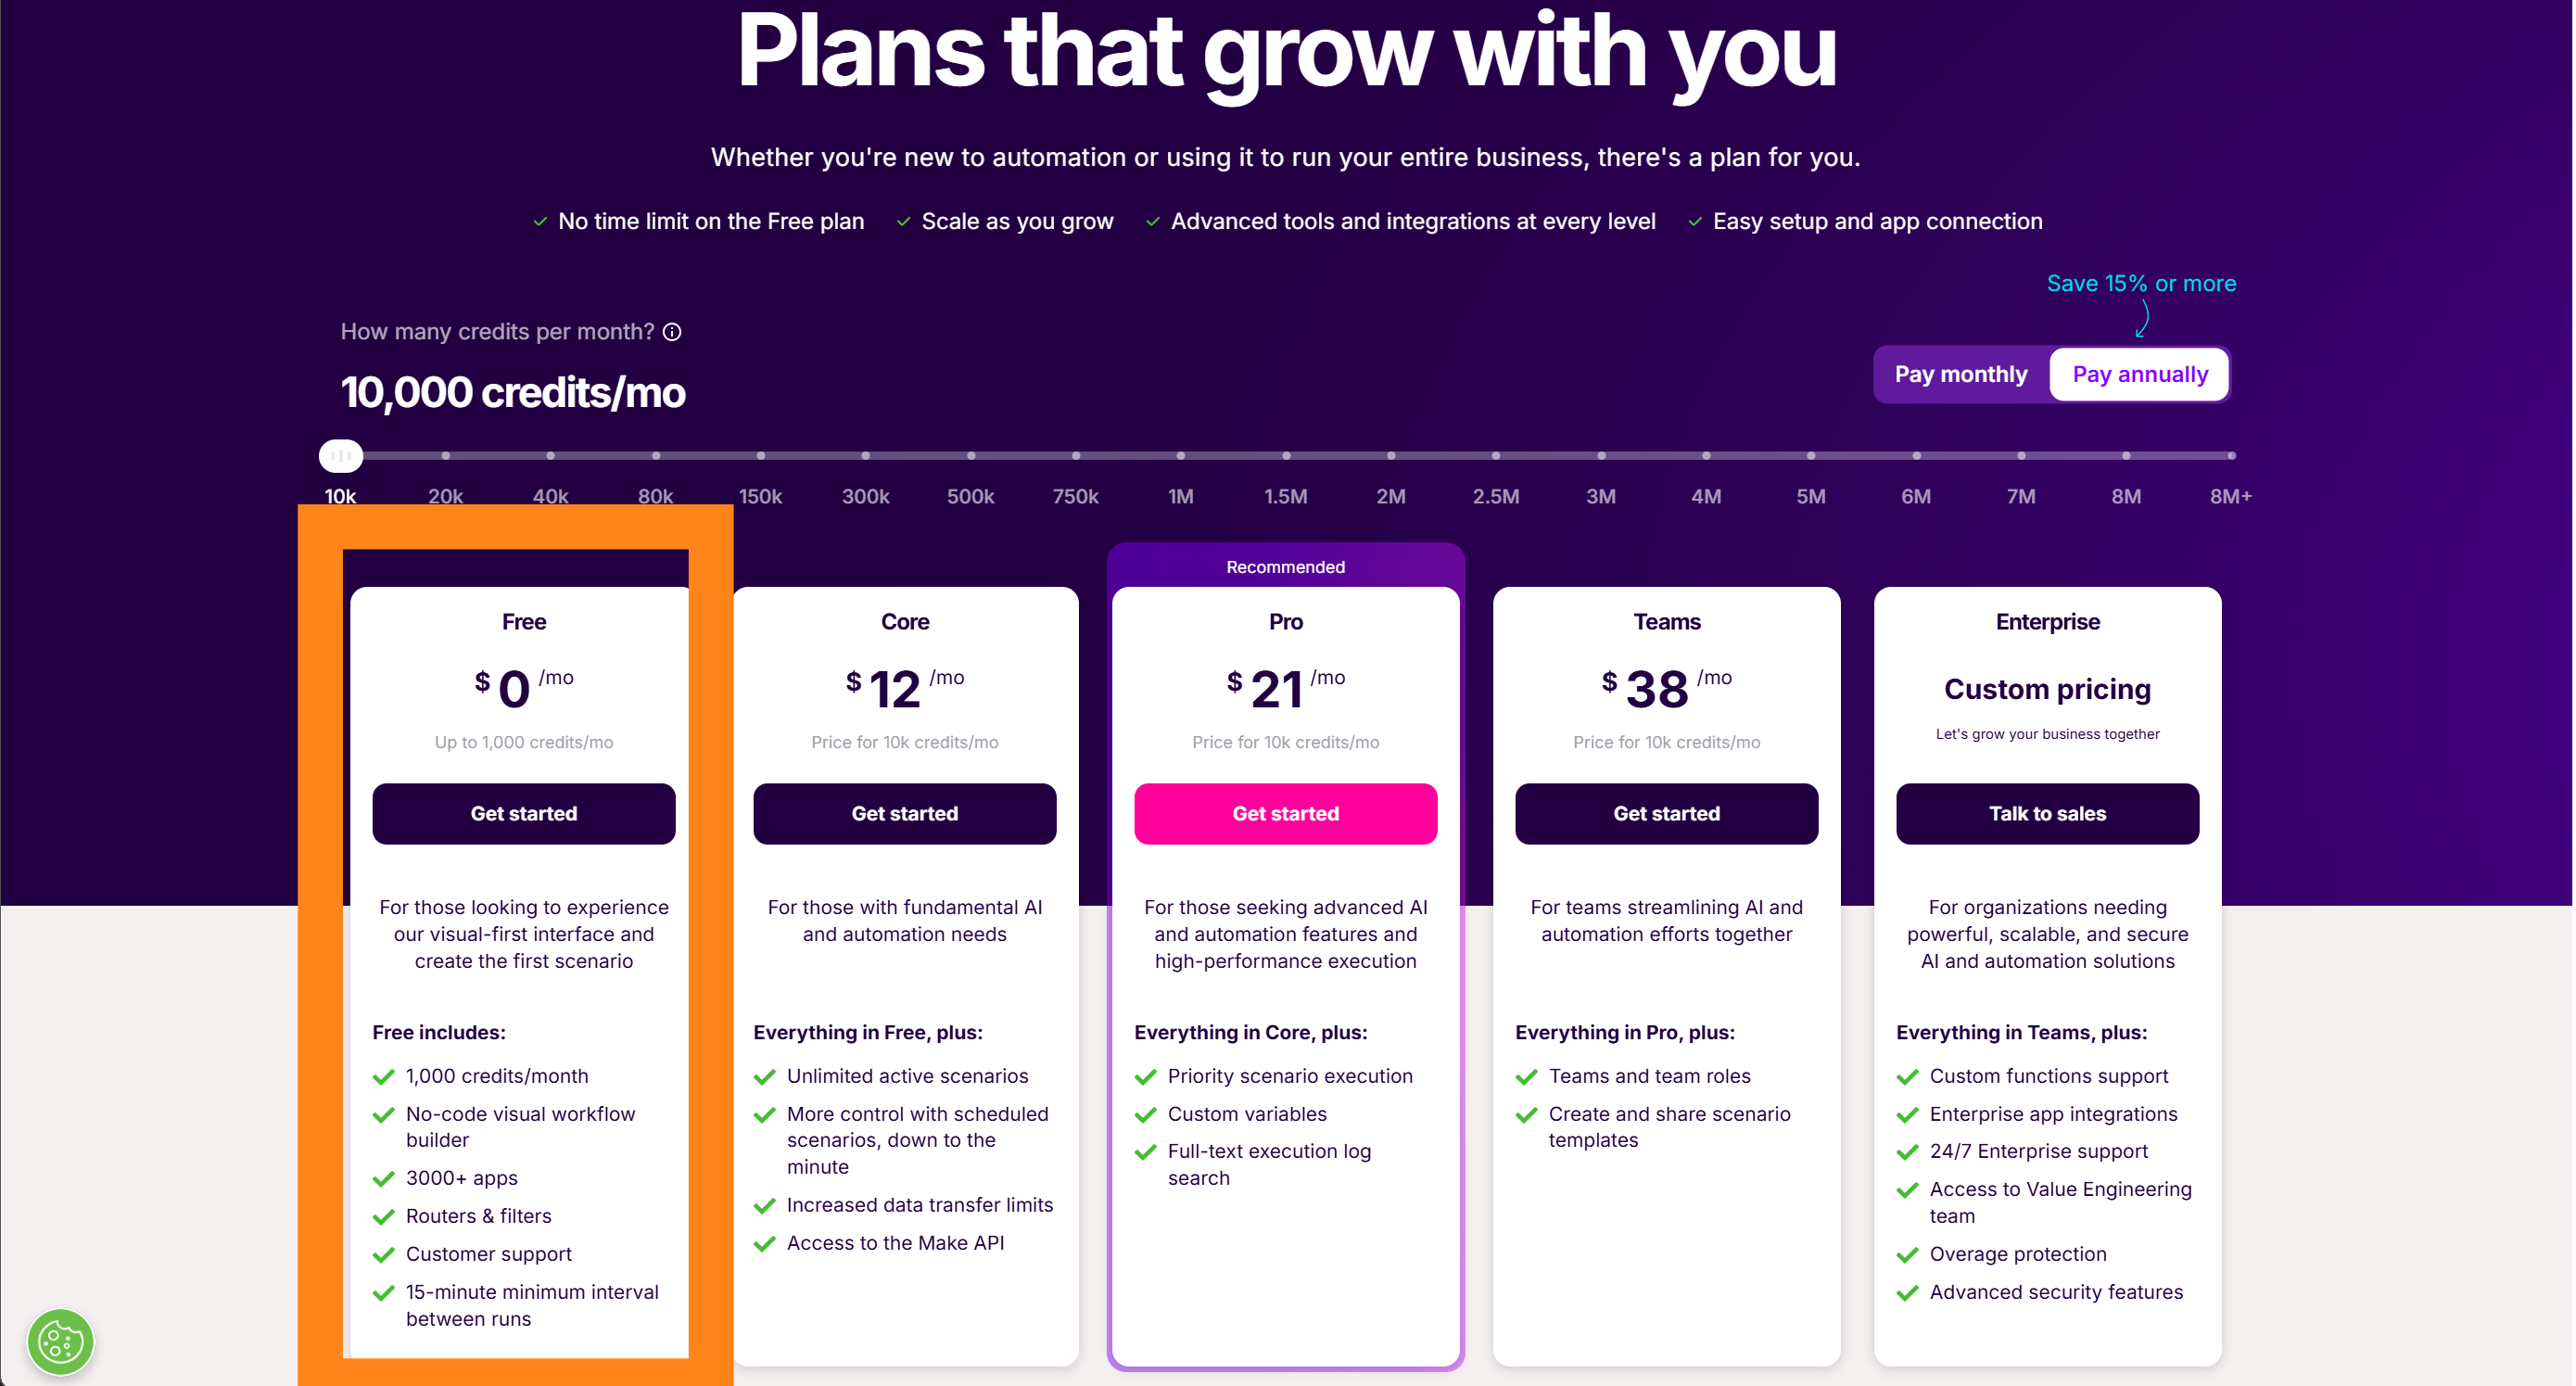
Make.com: The visual automation platform. $0 because their free account provides 1,000 credits every month, and this flow only uses 3-5 per run.
This 1,000-credit limit means you can run this flow at least 200 times per month before approaching the limit. The previous steps allow you to bypass the data transfer limitations (512MB-5GB) that Make.com and other services have, which you can hit pretty quickly if you have 1-minute-plus-long videos. They also allow you to have these automated posting flows while bypassing the data transfer step within Make, which causes the most processing and posting errors between these connected services, even on the paid plans. NOW LET'S GO OVER THIS IMAGE BELOW.
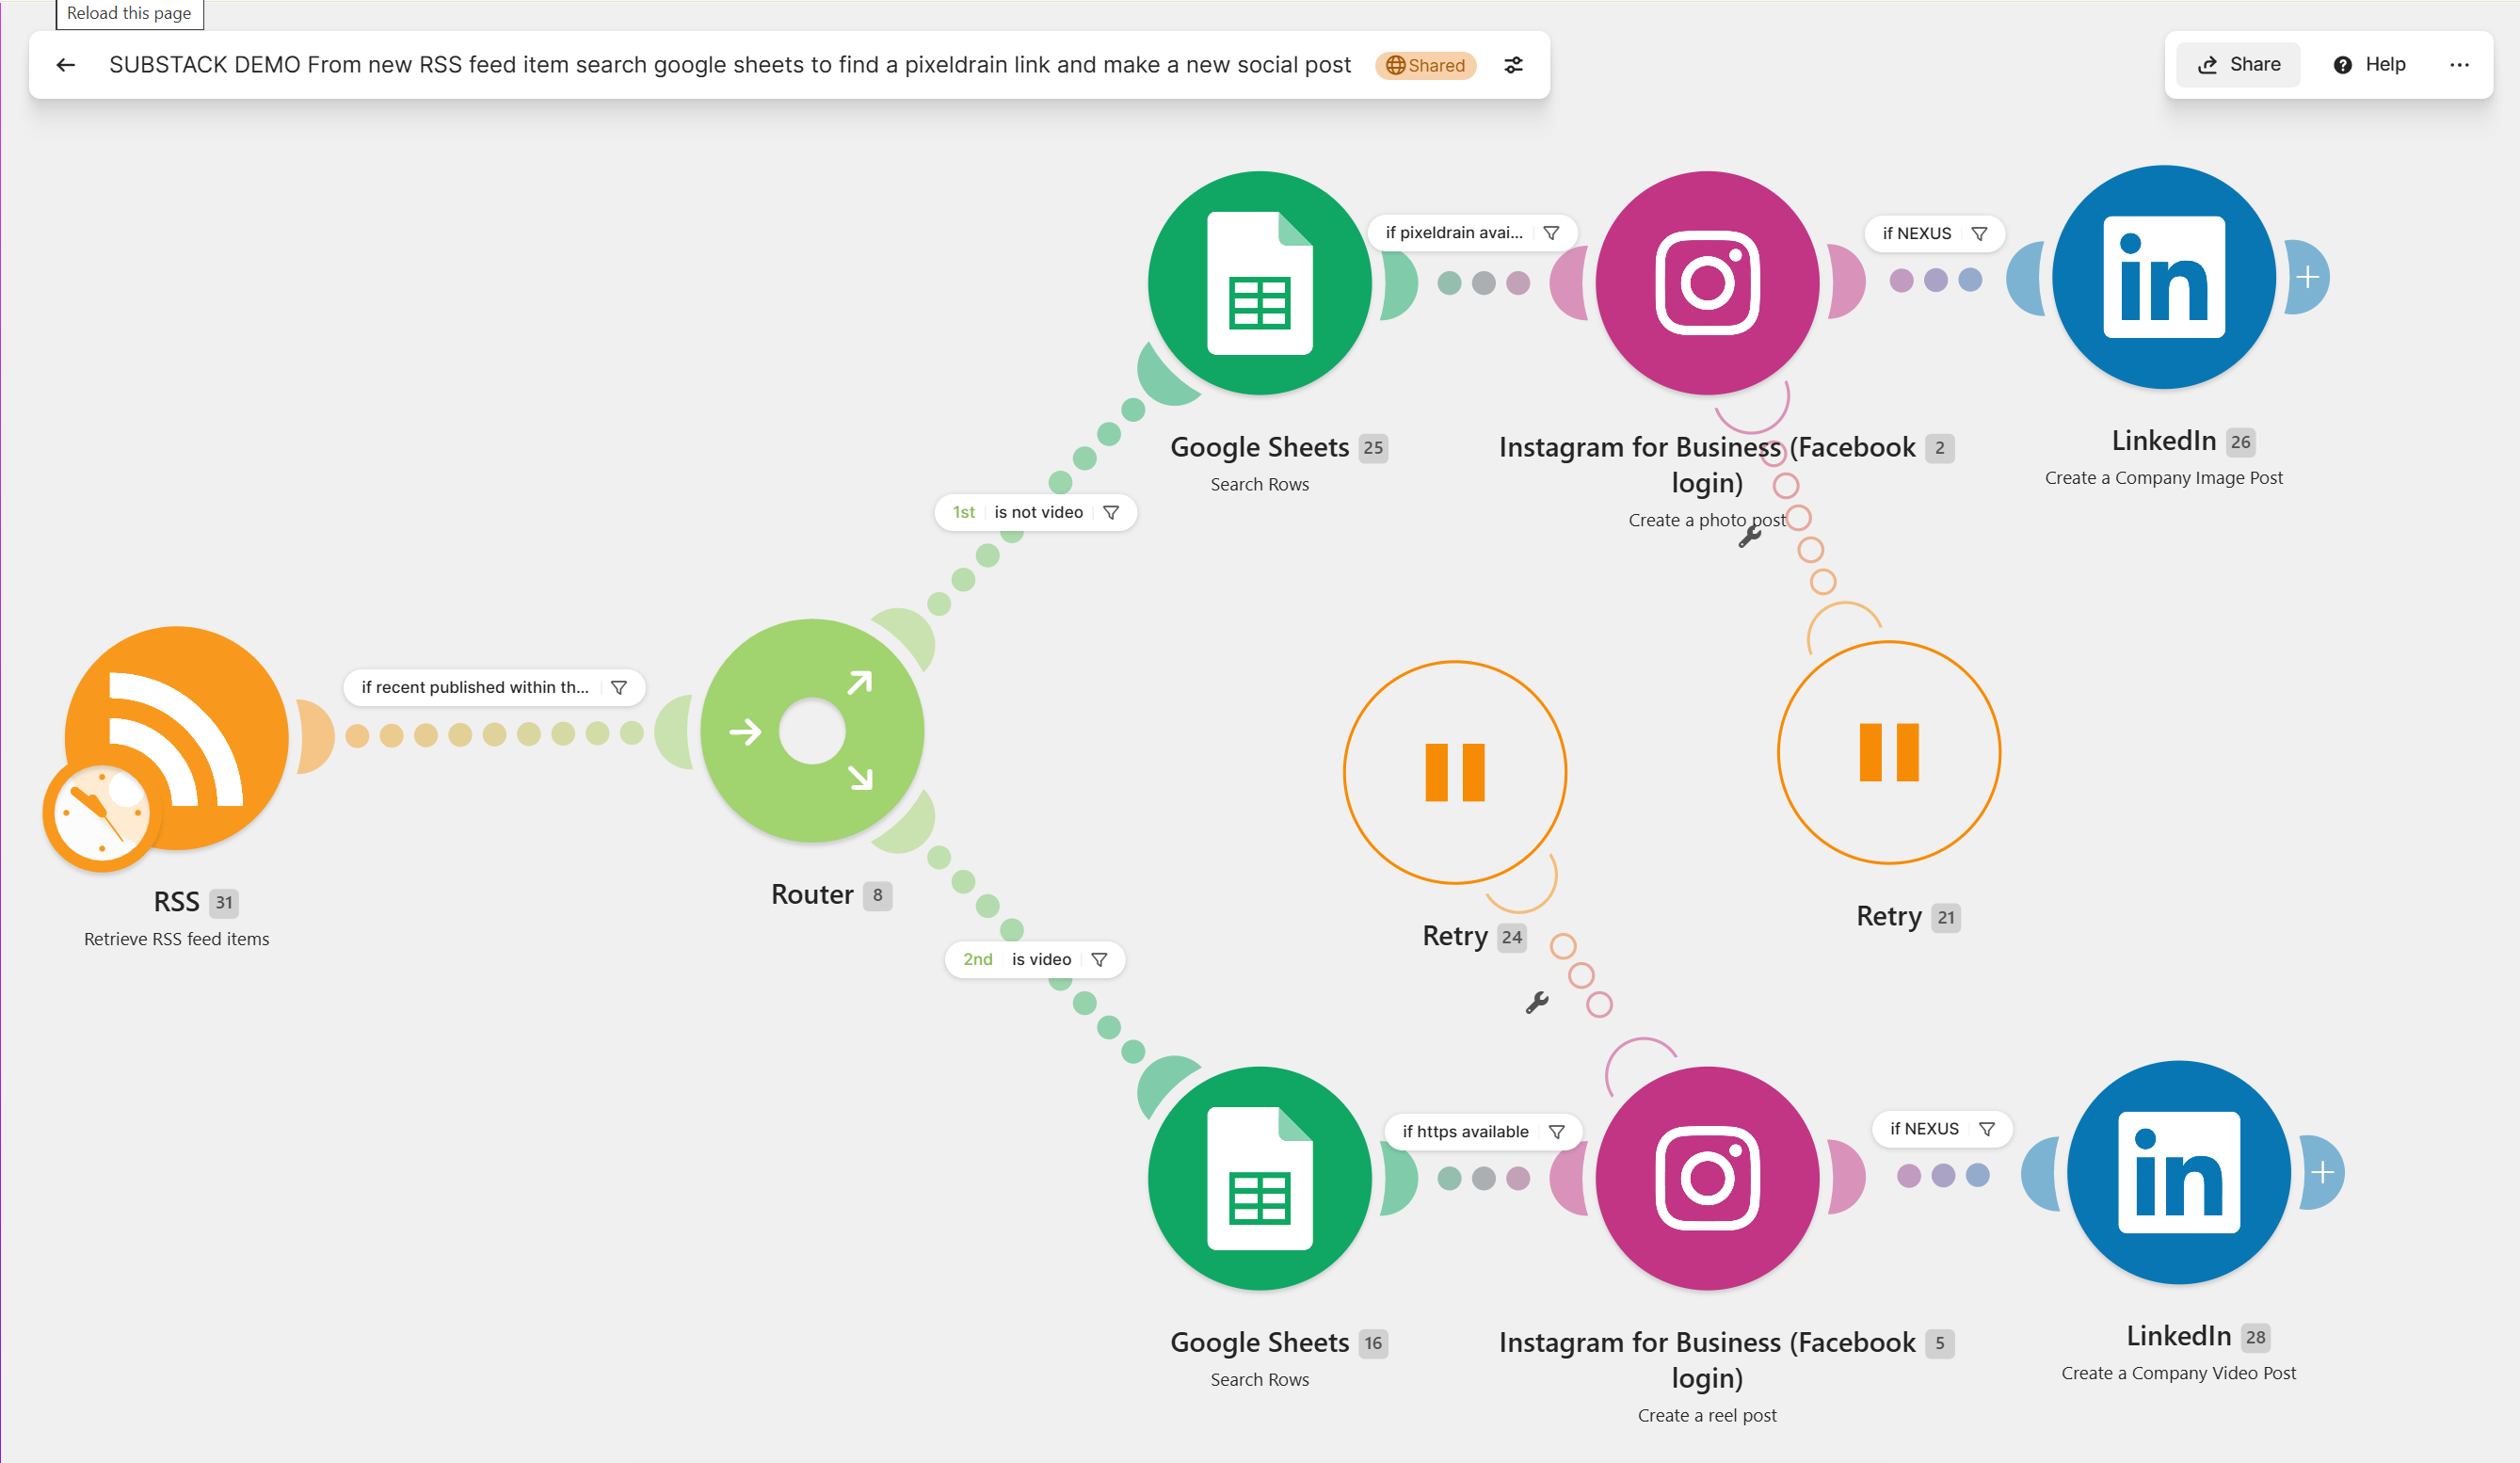
RETRIEVE RSS FEED MODULE: connect Substack RSS feed
do not select the WATCH RSS FEED MODULE. Too many potential errors can come up with this one and frustrate you.
add a filter to check the RSS feed for a new post on your Substack within the last hour.
ADD A ROUTER MODULE to split this flow into one for photos and one for videos.
this filter can be whatever you want. but I set it up to essentially look for a specific word in my Substack post title.
ADD A GOOGLE SHEET MODULE: connect this scenario to the Google Sheet you use for your social calendar.
in this module, you will tell it to look for the row where your Substack title matches the row value in Col D=SUBSTACK-title and sort the sheet by the Col C=drive-file-title that has your dated file names in it.
After this module, you will set up a filter to ensure that a Pixeldrain link is available. so if there isn't one, it won't try to post anything to any of the social media accounts, cause an error, or waste credits by retrying.
ADD A SOCIAL MEDIA MODULE LIKE INSTAGRAM OR LINKEDIN.
The social media service must be able to accept a media URL as a posting method. I haven’t tried all of them, but most allow it. I don’t think TikTok(I'm not on there actively, so I don’t know) allows it, but Meta, LinkedIn, Pinterest
You don't have to worry about YouTube, because Substack already handles all that for you. You can always go back in and edit your video titles and details later if you desire.
SET YOUR RUN SCHEDULE: Once you have these set up, now you can schedule how many times per day you want this scenario to automatically check your RSS feed.
One great feature of this type of flow is that you can branch it as many times as you want (I have 2: one for photos and one for video) based on any filters you want to apply. You can really personalize it for your needs.
HERE IS THE LINK TO THE SCENARIO if you don’t want to build it from scratch: https://us1.make.com/public/shared-scenario/4Z3sTKZQ5bM/substack-demo-from-new-rss-feed-item-sea
I already paid for Google Drive storage, so this costs me only an additional ~$60 per year. Now I can delete them from my phone and interact with the services only via the browser or an Android emulator on my laptop. Glorious.